The most important part of every hunt is preparation.

From having the right equipment, placement and scouting to shooting practice, we got your covered!

Learn how hunters like you set up their gear, scout like a pro and determine shot placement to ensure a proper finish to the hunt.

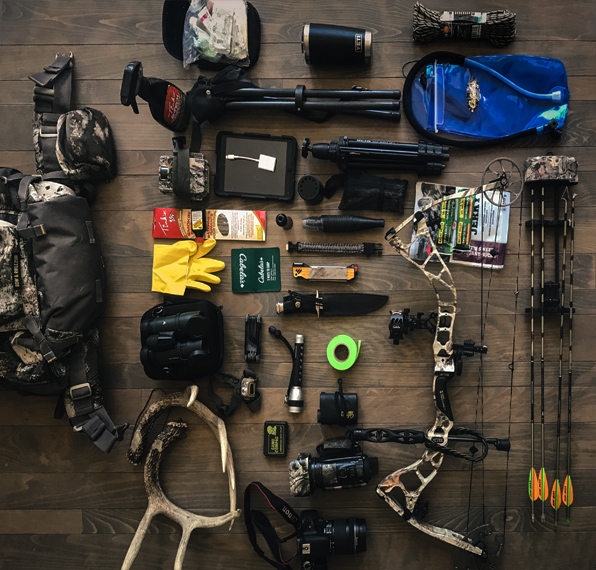
PRO STAFF PACK – KEITH LOVELACE
See Inside

See Inside

PRO STAFF PACK – KEITH LOVELACE

  • YETI® Rambler Tumbler
  • Bass Pro Shops® Multipurpose Camo Rope
  • Cabela's Intensity 1600 Laser Rangefinder
  • Cabela's Instinct Xcite Compound Bow
  • Coghlan's Paracord Bracelet
  • Cabela's LED QUL Headlamp
  • Cabela's Bow and Rifle Pack
  • Tink's Smokin' Sticks Cow Estrous Elk Lure
  • Hydrapak Shape-Shift Reservoir – 2 Litre
  • Buck Woodsman Model 102 Knife
  • Vortex® Diamondback® Binoculars
  • Cabela's E-VAC 2CR Tactical Flashlight

Shop this pack

Back

Back

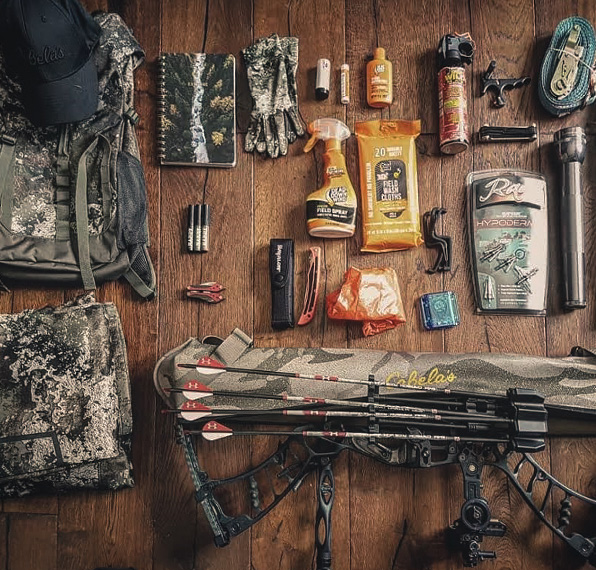
PRO STAFF PACK – PAIGE GALEA

See Inside

See Inside

PRO STAFF PACK – PAIGE GALEA

  • Cabela's Instinct Xcite Compound Bow
  • Cabela's Carbon Hunter with 2" XPV Vanes
  • Cabela's Multitool
  • Dead Down Wind Field Spray
  • Dead Down Wind Field Washcloths
  • Cabela’s Men’s Performance Cap
  • Cabela's Bow and Rifle Pack
  • Cabela’s Men’s Lightweight WINDSTOPPER® Gloves
  • Bass Pro Shops® 40-Lumen LED Pen Lights Two-Pack
  • SHE® Outdoor Women’s Performance Rain Jacket

Shop this pack

Back

Back

Scent Control Tips for Deer Hunting

Scent Control Tips for Deer Hunting

See More Deer with Scent Eliminators & Attractants
If there is one thing that a white-tail hunter should have, it is a strong focus on scent control. A white-tail deer's nose is sharp and 500 to 1000 times more accurate than humans.

Can you defeat a deer’s nose? Definitely, not! But with a detailed strategy, you can earn an extra 10 seconds to hunt a deer in range or even allow a deer to get 5 yards closer.

Consider checking the provincial guidelines about attractants for hunting. Learn how to get a big buck within your range:

Scent Control at Home

The first step is to address the body odours. Shower using scent-free soap, shampoo, toothpaste, and deodorant once a day. As it takes time to wear out the scents of other products, begin a scent-free regimen as early as possible and continue it until after hunting season.

Secondly, wash all your hunting clothing in a scent-free detergent. You can dry them either outside or using scent-free dryer sheets. Once dried, immediately transfer them into a sealed plastic bag or an air-tight container and transport them to the barn or your truck.

Pro tip: Eating an apple can naturally neutralize mouth odours.

Scent Control Before the Hunt

Leave your clothes in storage until the day of the hunt. After reaching your hunting destination, stand outside your truck to spray each pair of clothing with a scent-free eliminating spray designed to fight other odour-creating agents and bacteria.

You can spray vanilla extract scent on the bottom of your boots to help mask the scent you normally leave along the path. Take time to reach your hunting location: a slower pace reduces perspiration and helps with scent control.

Pro tip: You can also try out Merino wool for its odour-neutralizing properties.

Scent Control During the Hunt

On the day of your hunt, shower before heading out to wash off all the scents and oils built up from the previous night. When entering or exiting a stand during the hunt, position yourself in the wind direction to avoid deer approaching from downwind. Place a small Ozone Generator device that emits ozone particles to mask the human scent molecules when they meet.

Using the latest technology might help you to succeed in your game. There are several variables you cannot control during a deer hunt, but your scent control process is one you can.

Pro tip: Use scent-free products year-round when planting food plots, checking trail cameras, or hanging tree stands.

Scouting

“With any form of hunting, scouting is absolutely paramount. Most successful hunters will spend as much or more time scouting as they do hunting. It doesn’t matter how well you’re prepared if there’s no game in the area.”

– Keith Lovelace, Cabela's Canada ProStaff

Guide to Trail Cameras For Big Game Hunting

From having the right equipment, placement and scouting to shooting practice, we got your covered!

Understanding Trail Cameras for Your Big Game Hunt
Trail cameras are incredible tools for hunters, people needing home security and wildlife watchers. Modern-day trail cameras have many applications, and there is no limit to their uses and advantages. When choosing, consider your usage.

A reliable trail camera can take high-quality pictures and videos, has sufficient memory, and can work at night. Here are a few uses:

Scouting: Scout smartly with trail cameras that can provide hunters and wildlife watchers with precise information about the animals that frequent the area. It will show you the gender, number, and size of game animals in surrounding area. Additionally, it will take pictures of other animals that pass by.

Home Security: Trail cameras are popular when it comes to home security. On several occasions, setting up one or two trail cameras around your property is less expensive than a home security system. Trail cameras are excellent at providing nighttime photos and videos. You can use them all day and stamp the footage with accurate time and date.

Essential Trail Camera Features for Hunting

Before purchasing a trail camera, consider the following features to increase your success.

Image Quality: The more megapixels there are, the sharper the image will be. However, megapixels cannot be your only criterion. Super-high megapixels are necessary for scouting or outdoor wildlife photography. You can still get a solid image for scouting or home security with a lower count.

Trigger Speed: It refers to how fast a camera can take pictures once it detects any motion. The faster the trigger speed, the better. Slow trigger speed results in photos with half animals or none. Some of the best trail camera's trigger speed is less than half a second.

Tip: For cameras with slower trigger speeds, aim down a game trail. This will keep the target in the frame for a longer period.

Detection Range: Detection range is how far away a subject can be and still trigger the camera to take a photo. A long detection range can cover more ground, and it is ideal for surveying a large field for wildlife. On the other hand, short detection ranges are great for more enclosed spaces or game trails.

Flash Range: Flash Range is how far the subject could be and still get illuminated by the flash. Higher flash ranges can yield more scouting information.

Flash Type: Like all cameras, trail cameras require light to take a picture, especially at night. Choose the right flash type for your intended use:

  • White Flash: This flash uses bright, white light to brighten the subject. It results in full-colour images during the day and night. However, when a white flash is triggered, it might spook the wildlife.
  • Low Glow: This is also known as Infrared or Red Glow. This flash produces a dim but still-visible red glow when taking nighttime photos. It results in only black-and-white images at nighttime.
  • No Glow: Also known as Black Flash or Black Infrared. This flash emits no visible light and eliminates any chance of scaring the game away. It only produces back-and-white nighttime photos. It is an ideal option for home surveillance as it does not alert anyone.

Cellular VS Standard: Both types use SD or microSD cards to store images and videos. A standard camera requires the user to physically retrieve the card from the field to view the photos on a computer or mobile device. A cellular camera can transmit images directly to the user, eliminating the need to return to the field. However, this convenience comes at an extra cost for cellular subscriptions. Hunters usually consider upgrading their cellular cameras to lithium or solar power solutions.

Trail Camera Footage: Trail cameras offer valuable information for hunters. The images come with data stamping, featuring information about the date, time, temperature, and moon phase. This can help hunters understand the behaviour patterns of their game animals and make more informed decisions about their hunting strategy.

Battery Life

Have a reliable and long-lasting power supply to capture high-quality images and videos. There are two main options to consider:

Lithium Batteries: Lithium batteries are a great choice as they last longer than alkaline batteries and perform better in cold weather. Alkaline batteries in trail cameras are not recommended by many. Depending on the trial camera and its activity, lithium batteries last longer and provide consistent power.

For example, an alkaline battery with 50% power left will only supply 50% power to a device, whereas a lithium battery will supply 100% power until it runs out.

Solar Panels: Solar panels can power your trail camera indefinitely if there is sunlight. Any trail cam with an external power port accepts solar panels as a supplement for your batteries. But they are more noticeable and require a setup that allows them to receive direct sunlight.

Where to Mount Your Trail Camera
Deciding where to place your trail camera depends on your intent. If you want to capture a deer, placing your trail cam at or near eye level on a forest tree is ideal. For watching birds, you may want to mount your trail camera high up in a tree to observe a nest. For home security, mounting it on a fence, a tree or a house can give you better results. Attach your trail cam to a tripod when there are no natural mounting objects.

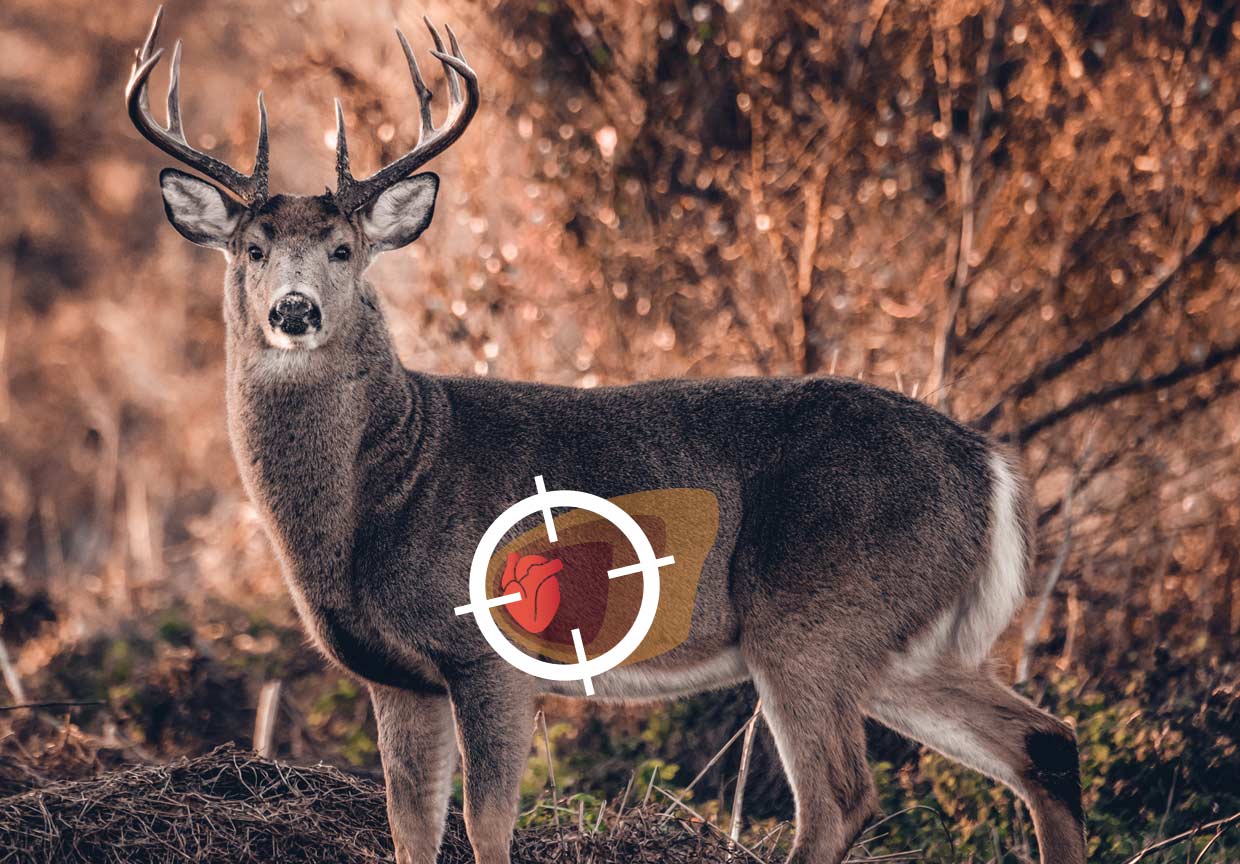
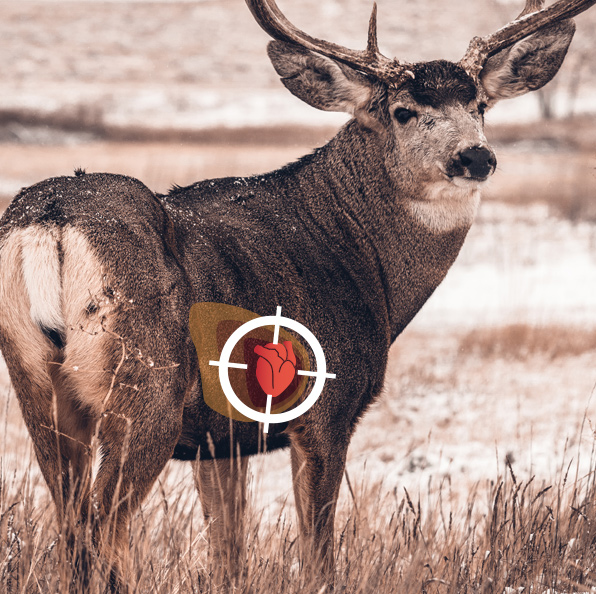
SHOT PLACEMENT

Broadside – Lungs, liver, heart
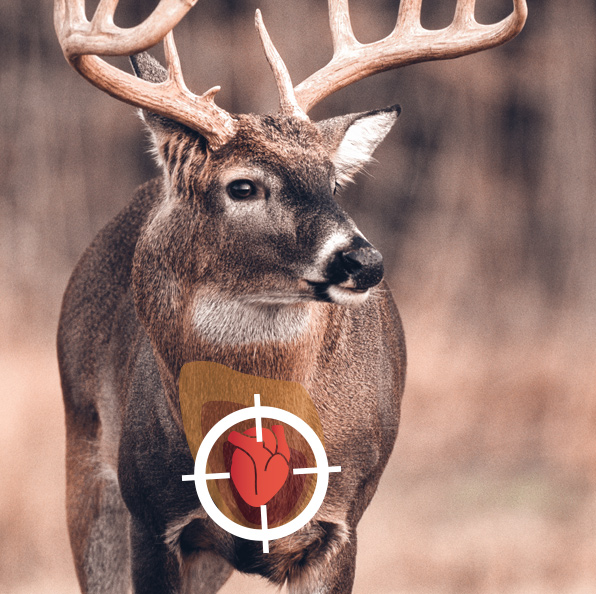
Front – Heart

Quartering – Heart

In-The-Field Prep
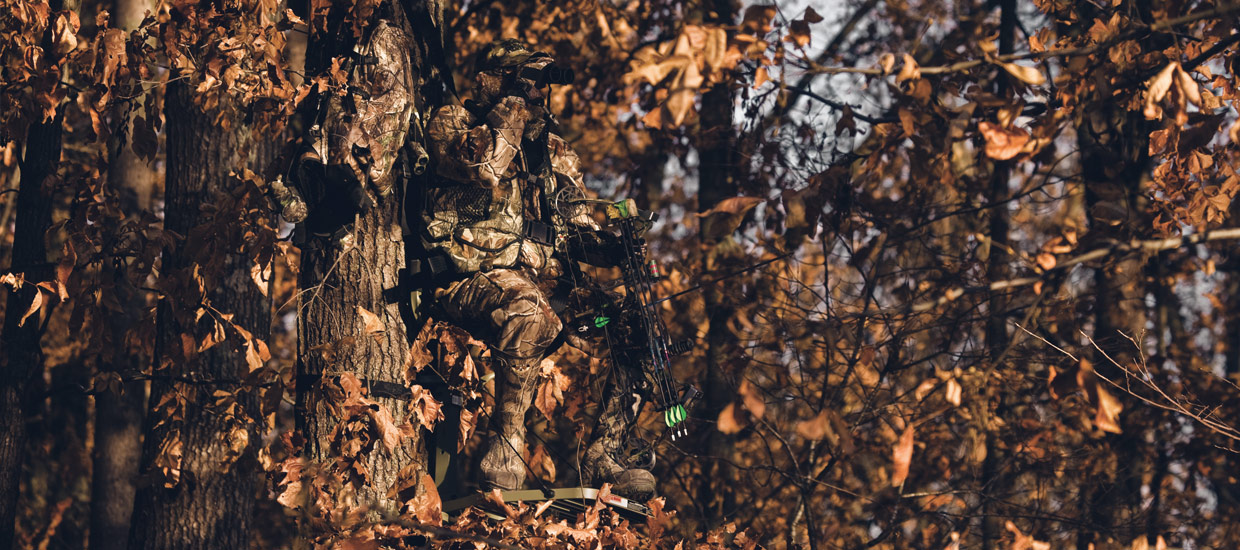
Planning Your Hunt
If you're not hunting a familiar area, take some time to visit your local land maps store and get a print out of your desired public land spot. Make notes of trails, scat, tracks and rub marks. Set up trailcams ahead of time to confirm theres action and to map patterns where you plan to hunt.

Setting-Up Tree stands
Don’t hang the stand too high. Tree stands are meant to get you off the ground and out of sight. Going too high adds additional risk to your hunt. Keep your shot placement and stability in tact by going up about 15–20 ft.


Food Plots for Deer Hunting

Food Plot Basics

Food plots are one of the most popular topics amongst white-tail deer hunters, as they require extensive research and scouting. Plan your hunt well in advance by checking out prime locations for food plots, hybrid basemaps, and entrance and exit routes on OnX Maps. Your first step is to select the hunting property and identifying its water resources, boundaries, and wooded areas. Ensure you have easy access to equipment from the location.

Things to Consider Before Making a Food Plot
Three main factors to consider before finalizing your food plot and starting the process:

  1. Test the Soil: Buy a pH testing kit and check the pH levels in the soil. Having proper pH levels and adequate sunlight will help your food plot grow.
  2. Setting up the Plot: Get rid of weeds and unwanted grasses that fight for the sunlight. Before continuing to work on the plot, apply an herbicide a week or two in advance. When the weeds wilt, churn and break the ground to the needs of your planting. After tilling the soil, add fertilizer.
  3. Plant Your Food Plot: Consider what and when you will be planting. Get the right mix: some crops are annual and need replanting, while some are perennials. Maintain your crops with weed control, mowing and fertilizer if necessary.

Tip: Remember to plant your seeds according to the crop guidelines. Avoid covering them with too much dirt and press the seeds into the soil using your off-road vehicle.

The Best Food Plot Shapes
While choosing a suitable location, plant type, and plot size are vital. Deciding on the right plot shape will prove effective and successful.

3 Small Food Plot Structures for Getting Deer into Range

  1. The Field Goal: Create a “U” shaped plot to attract deer with a field goal plot, and position yourself at the bottom. Add taller foliage or brush between the uprights for extra security and to avoid bunching. Shoot from the middle of the crossbar section when the deer walk straight through or travel broadside.
  2. The Hourglass: The plot has an hourglass shape with a narrow bottleneck in the middle. It is a good strategy for larger bedding areas where it becomes difficult to pinpoint the entry/exit. The bucks prefer a wide entry and slowly move to the middle. To increase your chances of spotting a buck, position your stand at the entrance or in the middle, within the range as they pass through the pinch point.
  3. The Hallway: The Hallway plot provides secluded feeding for deer and quick bites for bucks. You can adjust your stand position based on travel patterns and wind direction. It works well on a new hunting ground as there is little knowledge of preferred routes. It is versatile, flexible, and wide enough for comfortable buck movement and shooting options.
Improving Your Food Plots
4 Ways to Improve Food Plots
Food plots are like bait piles to attract deer and bucks. Planting a forage can help you connect deeply with the landscape and plant life. It is beneficial to wildlife that you understand the surroundings.

Elevate Your Food Plots
The quickest way to a deer’s heart is through his stomach. Here are four ways you can upgrade your food plots and bring in more deer.

  1. Diversify Your Food Plots: Diverse planting is an effective strategy to attract more deer throughout the year. For instance, having oats in the early season, clover in the mid-season and brassicas in the late season can help to promote the diversity of microbes within the soil and attract deer more consistently.
  2. Avoid Always Tilling the Plots: When you till the soil, it reduces the organic matter, loses soil moisture, damages soil biology, destroys soil structure and fertility, and reduces water infiltration capabilities in the future. A no-till approach can lower soil erosion and naturally produce healthy forage.
  1. Food Plot Screens: A food plot screen is a visual barrier to provide wildlife with added security when feeding. A visual barrier encourages deer movement and rutting bucks to travel into the food plot. It helps you to move around the food plot during daylight without scaring away deer. You can plant tall annual grass like Egyptian wheat or other annuals like corn or sunflowers.
  2. Natural Food Sources: The deer world revolves around food. Deer love a variety and eat hundreds of different natural food sources.

Here are a few species that can fetch excellent results:

  • Ragweed
  • Greenbrier
  • Pokeweed
  • Berries
  • Wild Grapes
  • Honey Lotus Pods
  • Beggar’s Lice
  • Oldfield Aster
  • White Cedar
  • Oak Acorns
  • Corn
  • Alfalfa
5 Food Plot Mistakes to Avoid
Food plots are intricate, and there is no single, all-in-one approach to building a perfect one. However, you can set up a food plot to attract deer by avoiding the following blunders.
A rundown of food plot mistakes:
  1. Plating Incorrect Mixes: Check to read the labels when choosing seeds and plant mixes. Choose seeds that will work for the spot you have. For instance, planting perennial brassica seeds can withstand browsing pressure even on small plots, unlike lablabs or soybeans.
  1. Choosing Wrong Locations: Planting close to property lines or roadways will attract unwanted people who might poach a large deer in the plot. Due to traffic or frequent noise, older animals do not frequent these locations. Planting strips of annual crops like sorghum, or Mossy Oaks Blind Spot, which can grow 8 to 10 feet tall, will help to protect these plots. Consider putting in native warm-season grasses like switchgrass or Indian grass for a long-term fix.
  1. Single-Species Plantings: Mixing different plants in food plots is ideal. Plants reach peak palatability at different times, attracting deer at various points throughout the year. Wildlife seed companies create plant combinations that grow together and complement each other. Using a mixture ensures that all deer in the area can find something to their preference and compensate for any poor-performing plants.
  1. Not Matching Plants to Soil: Planting the same forage on your property might be a poor decision. Different food plots forages are required depending on sunlight and the consistency of the soil: dry upland, moist bottomland, clay, loam or sandy. If ladino clover yielded positive results in a lowland plot, it is unsafe to assume it can give a similar output on an upland site. Some plants require a low pH, while others need it neutral. Consult an expert or farmers near you to understand better.
  1. Skipping Soil Testing: A soil test can tell you nutrient levels and help you calculate the amount of fertilizer you can use for perfect growing conditions. You can dig a few places in your plot and send it to get it tested or test it using a simple soil kit.

Shooting Lanes


In thick forest, you'll want to ensure your shooting lines are clear. Find a great spot that requires less disturbance so your deer doesn't get spooked by your handy work.

Baiting Regulations


When it comes to setting up feed/bait and mineral sites, each province's regulations will be different. Make sure to check your local hunting guide for official details.

Advanced Big Game

Elk Hunt
A full-grown bull elk can stand as tall as 9 feet, with antlers extending 4 feet above their head. Don’t underestimate the sheer size and weight of these beautiful giants. Hunting elk can be a challenging, but intensely rewarding experience, provided you have the gear and the know-how to get the job done.

Learn more about elk hunting

Moose Hunt
A bull moose in full spread is one of the most imposing animals in the Canadian wilderness. Taller than a saddle horse, large bulls can weigh over 1300 pounds. Hunters who are lucky enough to take down a full-grown moose are rewarded with a ton of great meat!

Learn more about moose hunting

Bear Hunt
An apex predator of the Canadian wild, black bears can weigh up to 900 pounds and boast impressive speed, agility and sense of smell. Take extra care when hunting these majestic creatures. Those who succeed are awarded a beautiful pelt, meat, and a good story or two.

Learn more about bear hunting